Introduction
Hello, everyone. Today we’re going to review 2 contracts instead of 1. We will include contracts that involve cross contract calls, and talk about promises, and how they work at NEAR. If you want to learn more about how composability works this is a good session to read. The first contract that we’re going to take a look at is called a whitelist contract, and it is used on the mainnet to whitelist staking pools. This is important because the distribution of tokens is done through smart contracts. We use lockup contracts which we’ll eventually review in this series, but the way it works is that the lockup is a standalone contract that holds tokens that are supposed to be released over a period of time. Let’s say the tokens are released over 2 years, and are linearly getting allocated every block. What we wanted to do is to give the ability to stake these tokens including the tokens that are not released yet. This means you should be able to delegate all of the tokens that you have locked for 2 years for example, and start earning rewards on them. This is done on a smart contract, and a lockup contract is essentially calling the staking pool contract that we reviewed before and transferring tokens from one contract to another. The tokens from the lockup contract leave the account, and go to the account of the staking pool. If a staking pool doesn’t provide the guarantees that are required, such as the ability to return these tokens, then it means there will be problems. Let’s say that I build a custom staking pool that allows me not only to stake tokens, but also withdraw them to any account. This type of operation will allow you to get liquid assets before the release period ends. So you will be able to withdraw, and this is not the desired behavior.
That’s why we introduced the whitelist where custom implementations of the staking pools that are approved by the NEAR Foundation can be used by lockup contracts. At the same time we wanted to give the ability to create new staking pools that are already approved by anyone without going through approval from the NEAR Foundation. This allows anyone to create a new staking pool through a staking pool factory. The staking pool factory is the second contract that we’ll review today. The way it works is when a lockup contract wants to delegate, before they can transfer funds out to this contract they first need to select a staking pool. When you select staking pool, lockup issues a transaction to check if a given account id is whitelisted in a whitelist contract, and if it returns true, which means the account is whitelisted, then the lock-up contract can continue with delegation. It allows the lock-up to actually transfer to this contract. It means that the staking pool contract has some guarantees and APIs that the local contract expects, and it’s not going to lock the owner’s tokens, or steal tokens from the lockup contract. This also was important for the investing schedules of NEAR employees. It was on a four-year investing schedule, and that allows the foundation to issue a specific transaction to the lockup of that person in order to unstake everything from the staking pool and return the invested amount back to the NEAR foundation in case an employee leaves the job or was terminated. That’s the background about lockups and the whitelist contract.
The original repository for these contracts can be found on the NEAR Github. Here is the original video on which this guide is based on:
Whitelist Contract
Main Structure
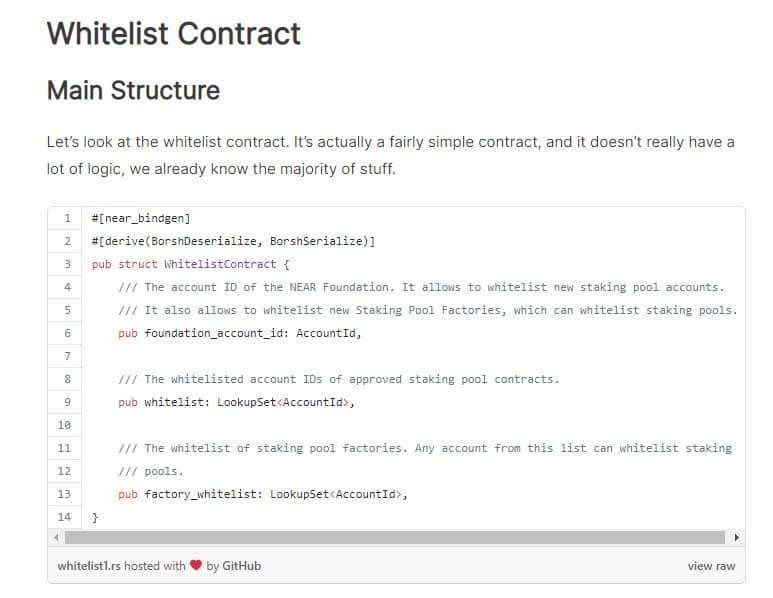
Let’s look at the whitelist contract. It’s actually a fairly simple contract, and it doesn’t really have a lot of logic, we already know the majority of stuff.
It uses a NEAR API that’s called LookupSet. It’s similar to an unordered set. It’s a persistent collection, but it doesn’t have iterators, so you cannot iterate over the keys of the elements of the set. You can only check if a given element is present, or not present, and you can add it to the set. You cannot check what elements are present in this set. By doing this it improves the efficiency of storage, and access from multiple reads to a few reads. The contract contains a few fields. The first is the foundation_account_id. This is the account id that controls the whitelist. It means that this account can whitelist staking pools by 1, and it can also whitelist staking pool factories. The factory is a contract that can create a new staking pool instance. The way it works is when you issue a transaction towards the staking factory that is whitelisted by this contract, it creates a new account as a sub account of the factory. In our case on the mainnet it’s called poolv1.near which is the staking pool factory that we use. It creates a contract, for example bisontrails.poolv1.near, on which it deploys whitelisted staking pool code that this factory can produce. We’ll go into the staking pool factory later, but at the same time it also can white list this given staking pool. Here’s how it works. The contract initialization only takes a foundation_account_id argument. A foundation account has higher permissions on this contract.
Getters
There are a bunch of getters.
You can check if a given stake input is whitelisted. This is how a lockup contract checks if the pool is whitelisted. It basically just checks if an element is present in a set. The second way it also can check is if the factory is white listed, so this is not really needed, and no one calls it.
Add Staking Pool Method
This is a method that can be called both by a factory and the foundation. What we do here is check that this staking method adds a new staking_pool_account_id to a whitelist. It checks if the account id is valid, then if it passes we check if this is a factory. We check in a set that the caller of this method is present in the whitelist of the factories. If it’s called by the staking pool factory, then it’s okay. If not then it has to be a foundation account id otherwise the contract will fail, and this method will panic. If we pass the permission check then we just add this staking pool to the whitelist. Right now we have only one implementation for the staking pool, but in theory we can modify this implementation when we introduce slashing for example, and a staking pool has to have the necessary permission. It needs to maintain some minimum balance. There’s some other change where we need to modify a validated contract over everyone’s investing period is 4 years. A lot of stuff can happen around the network and we need to have an ability to potentially change the staking pools. If the logic of staking pool changes for example. It allows the creation of a new factory that is a better version or supports something that was not supported before. It does not allow to change a reward fee instantly, but only allows it to change after a 7 day waiting period, or some other idea for a modification that will be a different factor.
Next remove_staking_pool can only be called by the foundation so that a staking pool can only be killed by the foundation.
Also, add_factory can also be only called by the foundation. It’s basic, it just adds to a white list of the factory accounts.
Finally, remove_factory can also only be called by the foundation, and removes the factory_account_id. Let’s say the first factory expires, then the foundation can basically remove the factory from whitelist as well as remove all the previous pools from the whitelist. Now, you will not be able to select one of the previous staking polls from a lockup contract, and finally there’s a check that this is called by foundation which is a comparison. This is a very simple contract, and it just operates on internal sets and the only true method that is visible by outside is is_whitelisted. It’s fairly simple, it’s just a bunch of setters and getters.
Immutability of Smart Contracts
The way smart contracts usually behave which is true on Ethereum, and on other platforms is they are immutable on themselves. On Ethereum every contract interior is immutable, but they use a proxy contract that allows them to upgrade the endpoint for certain contracts that are very critical to tokens. In this case our core contracts are essentially completely immutable, and we think about them as if we will deploy them once, and likely not be able to change them, because otherwise you’ll have to do a hard fork, and convince all validators to do some type of code migration. It is important, because the control over them has to be done on the contract level instead of on some centralized entities. For example, while the foundation still maintains large control over the staking pools by having the ability to remove staking pools here, it doesn’t have the control to blacklist a particular entity in the real world from deploying a staking pool. They still can create a staking pool with as much anonymity as possible, and create a staking pool without asking for the permission to become a validator on the mainnet. Some things come from decentralization, the other comes from limitation over the control. While the foundation is supposed to support the network it’s possible that in some scenarios the foundation can be forced to do something bad for the network. Let’s say the government comes in and tries to force them. If they have less ability to do this, then there’s higher security over the network. When we design a contract we think, “What is the amount of value in this contract?” or “What is the ability of this contract to influence the network in general?”. If it’s a small value, then it’s okay to keep the credibility as long as the community trusted, if it’s a large value, then it’s not okay. When we’re actually going to get to the lockup contract, and the way it’s designed you can see how, vesting for example, was designed to on one end allow the foundation to withdraw the remaining funds, but at the same time prevent the foundation from withdrawing the vested funds. It’s a legal way of doing things, except it’s written into the code. Whitelist is a very critical contract, because before the funds are locked, the majority of funds are kind of controlling the network through local contracts in staking pools through this particular white list so it was important to design it in such a way that it keeps decentralization, and security of the network without giving control to the foundation. Let’s say something happened, and the foundation started acting maliciously. Let’s say you were able to create a new staking pool through a factory and delegate to the staking pool, now the foundation cannot really prevent you from delegating to this staking pool.
Staking Pool Factory Contract
Include Bytes Macro
The staking_pool_factory contract is a contract that internally has the code of a staking pool contract. In Rust you can do this by using the include_bytes macro. It basically takes a local file and embeds it into the binary as a vector. What happens there is within this WebAssembly binary we can have some piece of memory allocated which represents a binary of this particular staking pool. Let’s get back to the top.
Structure
Once again this is the structure.
There was some information about the gas, we’ll come back to this later.
There’s a reward_fee_fraction that’s just copied from the staking pool contract that we reviewed before.
External Contracts
There are the arguments of the staking pool that it takes, and there’s traits, and external contracts so this is the high level interface that we use to call certain contracts.
We have two of them, the first can be any name. We call it ExtSelf, because it represents our own contract and contains a callback to a method on_staking_pool_create. The second trait is for the whitelist contract that we just saw called add_staking_pool. Here it is.
It’s exactly the same interface except the traits in Rust are like interfaces in java, for example. We just define the interface of a remote contract.
Initialization
Let’s go first through the scenario. When a factory is created we verify that it was not initialized and we verify the staking_pool_whitelist_account_id, the account id of the whitelist contract, during the initialization of the StakingPoolFactory. We need to know the staking_pool_whitelist_account_id. This is where the whitelist contract is deployed in order to whitelist our newly created staking pool instances. We remember this, and also create a set of already created accounts at the end of this snippet.
Main Method
Now that the staking pool factory is created, it’s called poolv1.near for example, and the foundation has whitelisted the factory on a whitelist contract by issuing another transaction. Now that this staking pool factory is whitelisted it means it has the permission to white list the new staking pools that it creates. So now a validator comes in, and they want to create a staking pool for themselves. The way it works is they call create_staking_pool, and it takes a bunch of arguments. The first argument is a prefix. Let’s say it’s bisontrails without the suffix of this current account id, and this comes from NEAR account names. An account can only create a subaccount, or very long account, so the staking pool factory creates a sub account under itself which will be bisontrails.poolv1.near. The owner_id is the account id of the owner of the staking pool as we discussed before. All of these three items are essentially arguments that you would pass to a staking pool when you first create it. It’s an argument that you can proxy towards the staking pool. For example, staking_pool_id can be bisontrails.near. The stake_public_key can be the staking key from running a validator node, and reward_fee_fraction can be 10% for example. Note that this method is also payable it means it takes an incoming attached deposit, and the first thing it asks is, “Did you attach enough deposit?” The deposit that you need to attach is 30 NEAR, and this has a lot of zeros, but this is because it’s in yocto NEAR. You need to attach 30 NEAR mostly because you need to cover the state for the contract itself on a newly created staking pool. The contract is fairly large, it’s 250 kilobytes and you need at least 25 NEAR for this, but it also takes some extra money to cover the price guarantee fund. This is one of those cases where you do have to have an attached deposit, because you cannot attach this much gas to this transaction. Also we cannot convert gas to NEAR within a contract, so ideally gas separation stays the same it’s only used for computation, some read/write operations, and cross contract calls. Balance is used for state storage and transfers. So in our case this will create a new account, and creating a new account on NEAR requires you to pay for the storage of this account. Storage in our case is not only going to be the account itself but also the contract of this account. In our case this is the code of the staking pool contract.
The next thing we do is verify that the prefix doesn’t have a dot meaning that it’s not a sub account itself. Then we create a new staking_pool_account_id by concatenating our account id dot (.) this new prefix. We verify that the new staking pool account id is valid. Basically if any of these asserts fail the NEAR Protocol will refund the tokens. If a transaction fails with an attached deposit, the attached deposit will go back to the sender or predecessor, because only the predecessor can attach a balance. It’s safe to do like a bunch of asserts here. Next we verify that the owner_id of the staking pool is valid. This is basically just a bunch of extra helpers that are also verified on the staking pool. This is to make sure that if you don’t pass the correct arguments, or slightly incorrect arguments you better fail early before everything executes in order to avoid burning gas, and locking the tokens that you spent. Finally we check using insert that the staking pool doesn’t exist. Basically insert will return true if it’s a new unique element, and return false if the element already exists in a set. This is how the Rust hashset works in the same way an ordered set works. So if the pool name already exists, we will not add this staking pool or try to create this account again. Insert does two things it adds this element to the storage, as well as returns true if the element is unique and didn’t exist before or returns false if the element is already present. If the set did not have this value present true is returned, if this set did have this value present false it returned.
Finally we use a medium level API, we don’t use our raw cost methods, but at the same time we don’t use a high level interface. The way it works is we create a new promise, which creates a temporary structure in our NEAR SDK, and it remembers the receiver of this promise. You can think about this as if the contract will issue the transaction towards that given account id. We will call a non-existing staking pool account id. Of course it’s not a transaction but a receipt, but it’s a technical detail. The next thing is the first action on top of this promise. We start batching actions into this promise. The first action is the create_account. This action will create a new account or it will fail if the account already exists. Then we deposit the attached balance. We deposit the entire deposit that was passed to us, so that we don’t keep it in this factory, and it will go with the same receipt on the remote account. Next we deploy a contract. As explained before, include_bytes is a macro that creates a static slice which we convert to a vector that will pass to a deploy action. This will deploy code on the remote account. You can only deploy code on the account you control, but create_account gives you permission to act like you’re the owner of this account only for this particular transaction. You can use the deploy_contract method, you can stake and do some other stuff on behalf of this contract in the first transaction that you do. Finally we initialize the staking pool contract using the serda API. We take this structure, and we serialize this into JSON, the method is called new. The first argument is the attached deposit to this function call. We don’t need it, because it doesn’t expect it. The next is the amount of gas that you take from your current amount of gas, and immediately take it out after which it goes to the promise. Let’s say our method was called 100 tera gas, tera gas is a kind of unit that is roughly human understandable.
You have 100 tera gas when you enter and we say we’re going to pass base (25 tera gas) multiplied by 2. We will immediately pass 50 tera gas to the function call of this method, so this 50 tera gas means we are only left with less than 50 tera gas, because we already burned some in the logic before. Plus every action that you include into this promise will also cost you some gas. For example, a deploy action will cost you in order to transfer the bytes from 1 account to another. Finally we use then. Then is similar to how javascript works, it attaches the dependency on the previous promise. This is the first promise, and we say then once it completes do the second promise. The way it works is you called let’s say bisontrails.near called this contract (poolv1.near) to create bisontrails.poolv1.near. We first create a promise to bisontrails.poolv1.near and then we attach a callback to this api which is not great in terms of using positional arguments for two different things. Either way it calls back the current account id. So it will call poolv1.near after the first promise has executed. Here is the structure: bisontrails.near calls poolv1.near creating a staking pool promise. Now this creates a promise to bisontrails.poolv1.near, and it also creates a promise to itself on the on_staking_pool method.
It needs the result of this method before this method starts and it passes three arguments here. It passes the staking_pool_account_id, the attached_deposit and the predecessor_account_id. So that’s who called us, which account tried to be created, and how many tokens were attached in case we need to do a refund. Now if bisontrails.poolv1.near is successfully executed then on_staking_pool_create will receive the result of execution. Let’s say there was some misconfiguration that this method will also be called, but will receive a callback saying it failed .We returned the main promise after, then it means we returned on_staing_pool_create first. It’s important, because the create_staking_pool method’s result depends on the result of on_staking_pool_create promise. The transaction doesn’t completely start in parallel, instead it now depends on the execution of this particular method.
Callback
Let’s look at the callback.
The first thing we do is we say that it can only be called by the current contract using assert_self which means no one else can call this promise.
The next thing we do is use another utility helper method which says if the dependency, the creation of the staking pool, succeeded or failed.
We do this the following way: we use two end methods first to check that the number of results is 1. This is an invariant because we already know that no one can call this twice, and the second is if the result is success. If the method executed successfully, then we return true if the promise failed, then it will be false. So now we know if the staking pool was created or not. Again, we also attached 50 tera gas to the callback so now we are in the callback which means we only have 50 tera gas.
If we succeed then we’ll log that the pool was successfully created, then whitelist it. Then we call another promise from a callback, and attach 25 tera gas. So now we call staking_pool_whitelist_account_id, the whitelist contract. Now, we can whitelist the staking pool that we just created, because we passed this argument in towards the callback. We return this promise so that we don’t stop the execution yet, because we only want to complete the entire transaction once the white listing completes. Rust doesn’t have return, because if the last value without a semicolon is given then it’s a return value. If the creation fails, it can fail for only one reason: if you put invalid ristretto key as we discussed briefly before. If there’s some weird curve that you created your staking key in, then it will fail. The reason why it fails is it means that the deposit that you passed to the staking pool for creation will be refunded to us, not to the predecessor. We have 30 NEAR on this contract, and we need to return them back to the sender so that we are not locking them up. The first thing we do is remove it from the list of staking pools that were created, because this was not successful. So we’re saying that creation failed, and we’re going to refund you the attached deposit. Now it’s not a real attached deposit, because the callback doesn’t receive the attached deposit. It flies through a separate refund receipt that usually arrives before the callback, and it also takes the predecessor_account_id. In our case if we call the predecessor_account_id, it will be us because this is a callback. We need to know who we should return tokens to, and the way we do this is create a promise using the new predecessor_account_id, and we return the tokens that were attached before. As you can see we do not return this promise we just say that’s it, we don’t care if it succeeds or fails the basic return of value false is saying the pool failed to be created. What happens now the transaction continues to be executed but the value will be returned to the front end. The front end is the NEAR CLI. You’ll immediately know that the transaction has failed. You may not get your money back yet, so you’re still waiting for this particular refund to execute in the next block but you already know that the pool was not created so that you can continue. This is an example of how you can do a parallel promise. This is how a staking pool factor works. Here is a getter which checks how many staking pools were created that can be called on the NEAR CLI.
Conclusion
Тhis concludes the NEAR Live Contract Review | Part 3: Whitelist and Staking Pool Factory. Thank you for taking the time to learn NEAR, there’s more content coming soon in this series.
Updated: August 22, 2022